
Hey! Do you guys remember me? This winter has been crazy for us. We all took turns being sick from Thanksgiving to Valentines. It was awful. Hopefully we can all stay well now that the sun has returned and our toes are finally begining to thaw.
I've finally had the energy to craft and sew again, so I've got some fun things to show you. :) Yay!
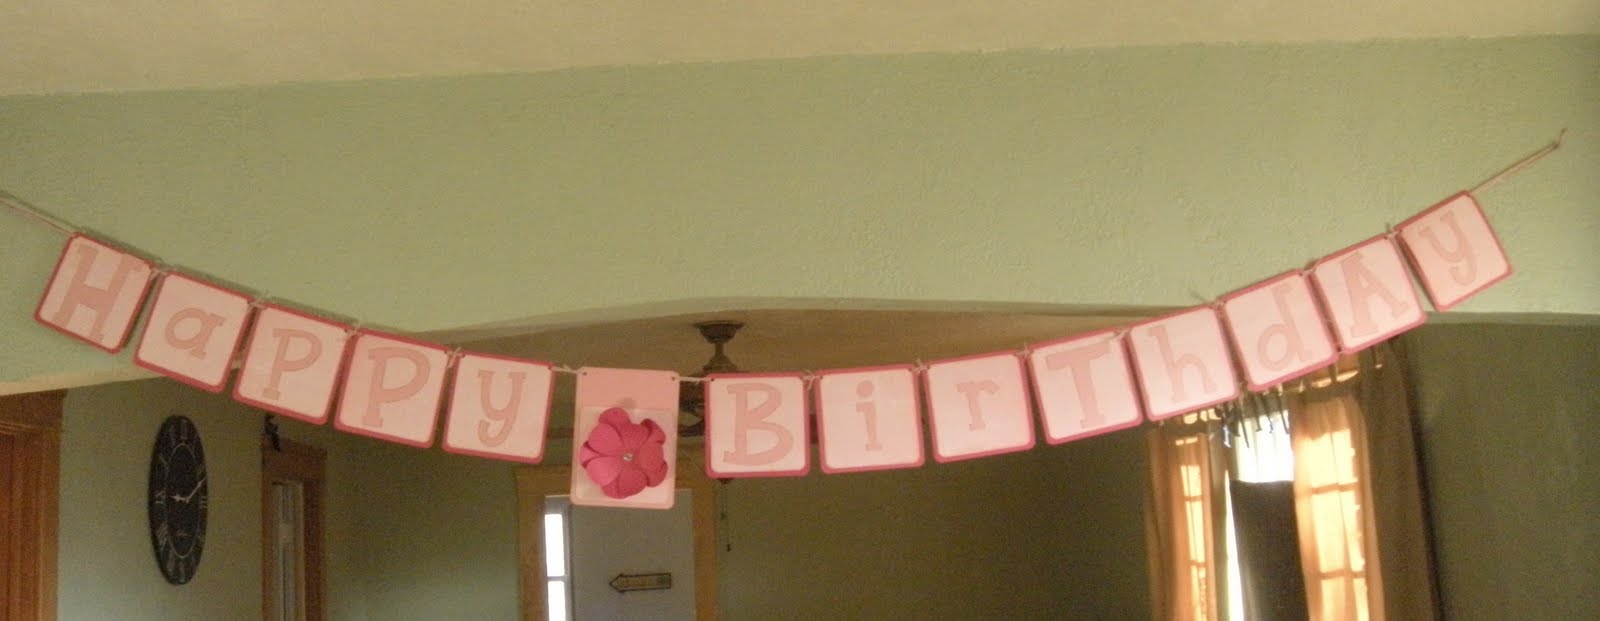
It's birthday season here. Jayden's was last week, Maycie's is in April and Dustin's is in May, so birthdays are on my brain constantly. For Jayden's birthday last year, I made this banner. I was so proud of it and I still love it. When I pulled it out to put it up last week, a few of the letters fell off. I guess my adhesive wasn't too permanent. I hate when packaging lies!

Do you want to make your own fun Birthday Banner?
Here's what you'll need:
4 sheets of 12x12 cardstock for your background color
4 sheets of cardstock for your main color
2-3 sheets for your letters
Adhesive
Ink for your edges, if you like a little distressing
About 3 yards of ribbon
Corner rounder
Hole punch

Start by cutting the background paper into 6x6 squares. You'll need 13 to spell Happy Birthday. If you want a divider between the words, cut another piece 6x8. ( I used a star in Jayden's and a flower for this one)
Cut the main paper into 5 1/2 inch squares (you'll need 13 of these, too) and round all the corners.

Ink the edges and glue the main paper on top of the background. Punch a hole in each top corner.

I totally spaced taking a picture of this, but cut your letters to about 5 1/2 inches tall. I used my Cricut and did a mix of capitals and lowercase letters. I also cut out my flower with my Cricut. Ink the letters and glue them onto the squares.
Cut your ribbon in to 11 7-inch pieces. You can go longer if you want to tie a bow. Just remember you'll need more than the 3 yards to do that.
I've finally had the energy to craft and sew again, so I've got some fun things to show you. :) Yay!
It's birthday season here. Jayden's was last week, Maycie's is in April and Dustin's is in May, so birthdays are on my brain constantly. For Jayden's birthday last year, I made this banner. I was so proud of it and I still love it. When I pulled it out to put it up last week, a few of the letters fell off. I guess my adhesive wasn't too permanent. I hate when packaging lies!

Do you want to make your own fun Birthday Banner?
Here's what you'll need:
4 sheets of 12x12 cardstock for your background color
4 sheets of cardstock for your main color
2-3 sheets for your letters
Adhesive
Ink for your edges, if you like a little distressing
About 3 yards of ribbon
Corner rounder
Hole punch

Start by cutting the background paper into 6x6 squares. You'll need 13 to spell Happy Birthday. If you want a divider between the words, cut another piece 6x8. ( I used a star in Jayden's and a flower for this one)
Cut the main paper into 5 1/2 inch squares (you'll need 13 of these, too) and round all the corners.

Ink the edges and glue the main paper on top of the background. Punch a hole in each top corner.

I totally spaced taking a picture of this, but cut your letters to about 5 1/2 inches tall. I used my Cricut and did a mix of capitals and lowercase letters. I also cut out my flower with my Cricut. Ink the letters and glue them onto the squares.
Cut your ribbon in to 11 7-inch pieces. You can go longer if you want to tie a bow. Just remember you'll need more than the 3 yards to do that.

Tie your letter squares together, starting with "H". I like to leave use a little longer piece (about 9 inches) on each side of the divider, just to separate the words a little more.
For this flower divider, I added a gem to the middle and curled up the petals a little to add some dimension.
For this flower divider, I added a gem to the middle and curled up the petals a little to add some dimension.


Cut 2 pieces of ribbon 12 inches long and tie on each end to make a little loop to hang your banner with.

And you're done! Go eat some cake!
 By the way, feel free to mix patterns and background colors! Jayden's has 3 different patterns and 3 different background/letters. You could mix it up a bunch of ways, and even spell other things (Spring, Happy Easter...). I've been thinking of making some double sided ones so I could just reverse it for another holiday. I'd love to see what you can come up with!
Thanks for reading!


I love it Andrea! It's gorgeous!!!
ReplyDelete*sighs* I need some of that talent!
lol, I can only sew, quilt, crochet, bake, cooke, garden, can & dream of knitting, but working with that paper stuff really makes my blood pressure rise as I am so clumsy at it.
Awe, that's such a sweet banner! I love that you used the little strips of ribbon between each letter!
ReplyDelete